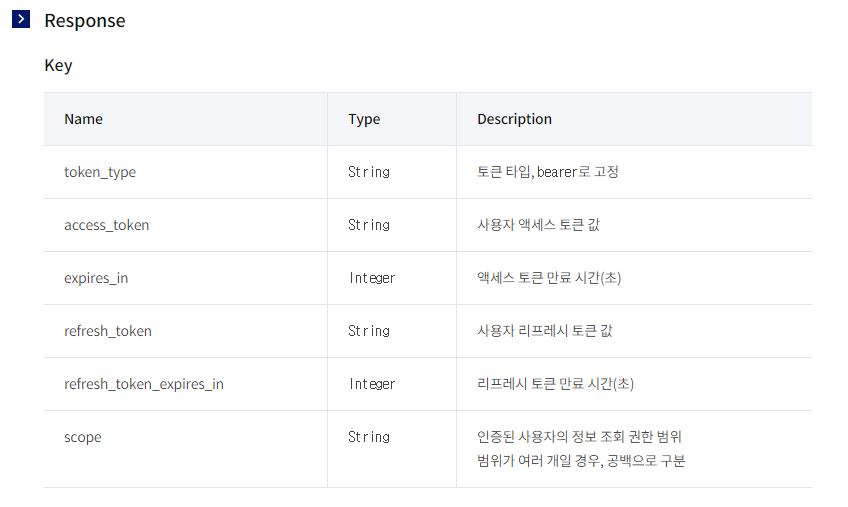
카카오 로그인 처리 단계를 아래의 세 단계로 나눠보았다.
인가 코드 받기 -> 토큰 받기 -> 사용자 정보 가져오기
이 중 인가 코드 받기 단계를 JavaScript SDK의 Kakao.Auth.authorize 함수로 요청하고 나머지 단계는 REST API로 처리해주었다.

카카오 로그인을 시작하기 전에 먼저 카카오 개발자 사이트에서 어플리케이션을 등록해주고 카카오 로그인을 설정해주어야한다. 카카오 개발자 사이트에서 어플리케이션을 등록 완료했다는 가정하에 작성하였다.

카카오 로그인 설정하기

카카오 로그인 설정하기

카카오 로그인 버튼 생성 & 인가 코드 받기 (JavaScript SDK 활용)

사용자가 카카오 로그인 버튼을 클릭했을 때, 클릭 이벤트 핸들러에서 Kakao.Auth.authorize 함수를 호출하면 카카오 로그인 동의 화면을 띄울 수 있다. 동의 화면에서 사용자가 사용자 정보 제공 및 기능 활용 동의를 하고 ‘동의하고 계속하기’ 버튼을 누르면 인가 코드가 발급된다.

1
2
3
4
5
6
7
8
9
10
11
12
13
14
15
16
17
18
19
20
21
22
23
<script type="text/javascript">
<!-- 카카오 로그인 javascript키 초기화 -->
Kakao.init('${SYSTEM_KAKAO_JAVASCRIPTKEY}'); /* */
Kakao.isInitialized();
</script>

<!-- 카카오 아이디로로그인 버튼 노출 영역 -->
<a id="custom-login-btn" href="javascript:loginWithKakao()">
<img
src="//k.kakaocdn.net/14/dn/btqCn0WEmI3/nijroPfbpCa4at5EIsjyf0/o.jpg"
width="222"
/>
</a>

<script type="text/javascript">
/* 카카오아이디로로그인 Script */
function loginWithKakao() {
Kakao.Auth.authorize({
redirectUri: '${SYSTEM_JSP_SITEURL}/login/snsKakaologin', /* redirect되는 URL */
scope: 'phone_number' /* 전달 받을 정보 */
})
}
</script>

redirectUri로 인가코드 전달 받기

redirectUri에 입력한 주소로 redirect가 되고 code(인가코드)를 전달 받는다.

이 코드에서 access_token, 사용자 정보를 가져오는 함수를 호출해주었다.

1
2
3
4
5
6
7
8
9
10
11
12
13
14
15
16
17
18
19
20
21
/** 카카오 sns 로그인 redirect 페이지*/
@RequestMapping(value = "/snsKakaologin")
public ModelAndView snsKakaologin(String code, HttpServletRequest request) throws Exception {
// 전달 받은 code를 사용해서 access_token 받기
String accessToken = getAccessToken(code);
//return받은 access_token으로 사용자 정보 가져오기
HashMap<String, Object> userInfo = getKakaoUniqueNo(accessToken);

String phone = (String) userInfo.get("phone_number");
String strPhone = phone.replaceAll("-", "");
strPhone = strPhone.replace("+82 ", "0");

if(userInfo != null) {
//사용자 정보가 존재하면 SNS로그인 처리해주도록 redirect
return this.redirect("/login/snsLoginWithPhone?snsType=K&phone=" + strPhone);
} else {
//회원가입 페이지로 redirect
return this.redirect("/join/join?snsType=K");
}

}

토큰 받기

전달 받은 code를 사용해서 access_token을 전달 받는다.

요청에 필요한 정보
토큰요청정보

전달 받은 정보
토큰전달정보

작성 코드

1
2
3
4
5
6
7
8
9
10
11
12
13
14
15
16
17
18
19
20
21
22
23
24
25
26
27
28
29
30
31
32
33
34
35
36
37
38
39
40
41
42
43
44
45
46
47
48
49
50
51
52
53
54
55
56
57
58
59
// 카카오 로그인 access_token 리턴
public String getAccessToken(String code) throws Exception {
String access_Token = "";
String refresh_Token = "";
String reqURL = "https://kauth.kakao.com/oauth/token";

try {
URL url = new URL(reqURL);

HttpURLConnection conn = (HttpURLConnection) url.openConnection();

//POST 요청을 위해 기본값이 false인 setDoOutput을 true로
conn.setRequestMethod("POST");
conn.setDoOutput(true);

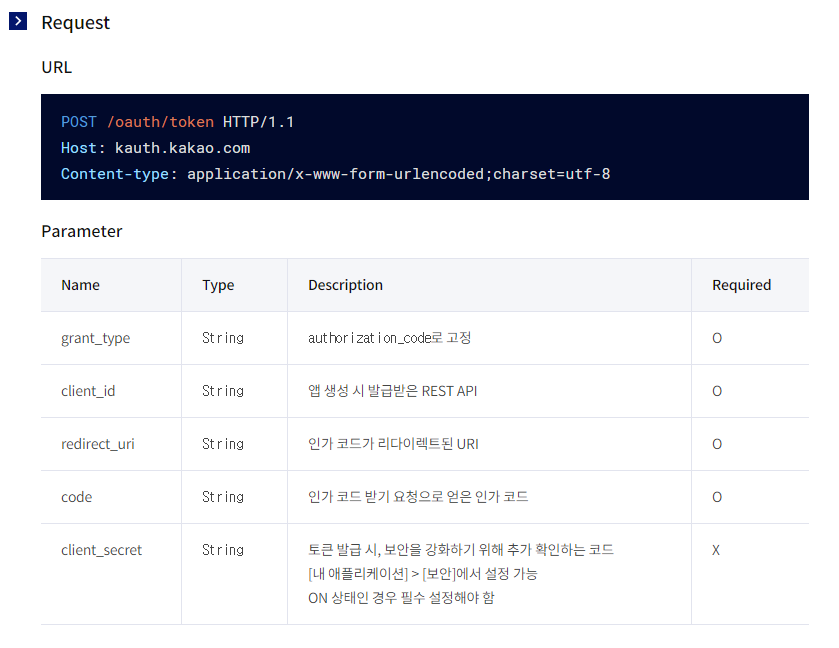
//POST 요청에 필요로 요구하는 파라미터 스트림을 통해 전송
BufferedWriter bw = new BufferedWriter(new OutputStreamWriter(conn.getOutputStream()));
StringBuilder sb = new StringBuilder();
sb.append("grant_type=authorization_code");
sb.append("&client_id=" + this.config.getString("system.kakao.restapikey")); //본인이 발급받은 key
sb.append("&redirect_uri=" + this.config.getString("system.jsp.siteUrl") + "/login/snsKakaologin"); // 본인이 설정해 놓은 경로
sb.append("&code=" + code);
bw.write(sb.toString());
bw.flush();

//결과 코드가 200이라면 성공
int responseCode = conn.getResponseCode();
System.out.println("responseCode : " + responseCode);

//요청을 통해 얻은 JSON타입의 Response 메세지 읽어오기
BufferedReader br = new BufferedReader(new InputStreamReader(conn.getInputStream()));
String line = "";
String result = "";

while ((line = br.readLine()) != null) {
result += line;
}
System.out.println("response body : " + result);

//Gson 라이브러리에 포함된 클래스로 JSON파싱 객체 생성
JsonParser parser = new JsonParser();
JsonElement element = parser.parse(result);

access_Token = element.getAsJsonObject().get("access_token").getAsString();
refresh_Token = element.getAsJsonObject().get("refresh_token").getAsString();

System.out.println("access_token : " + access_Token);
System.out.println("refresh_token : " + refresh_Token);

br.close();
bw.close();
} catch (IOException e) {
// TODO Auto-generated catch block
e.printStackTrace();
}

return access_Token;
}

사용자 정보 가져오기

리턴 받은 access_token을 사용해서 사용자 정보를 가져올 수 있다.

요청에 필요한 정보
사용자요청정보

전달 받은 정보
동의한 정보를 받을 수 있다. 이번엔 핸드폰 번호만 전달 받도록 구현했다.
카카오 동의항목은 https://developers.kakao.com/console/app/416585/product/login/scope 에서 설정할 수 있다.
https://developers.kakao.com/docs/latest/ko/kakaologin/common#user-info 문서 내용을 참고해서 전달 받을 정보를 설정하면 좋을 것 같다.j

작성코드

1
2
3
4
5
6
7
8
9
10
11
12
13
14
15
16
17
18
19
20
21
22
23
24
25
26
27
28
29
30
31
32
33
34
35
36
37
38
39
40
41
42
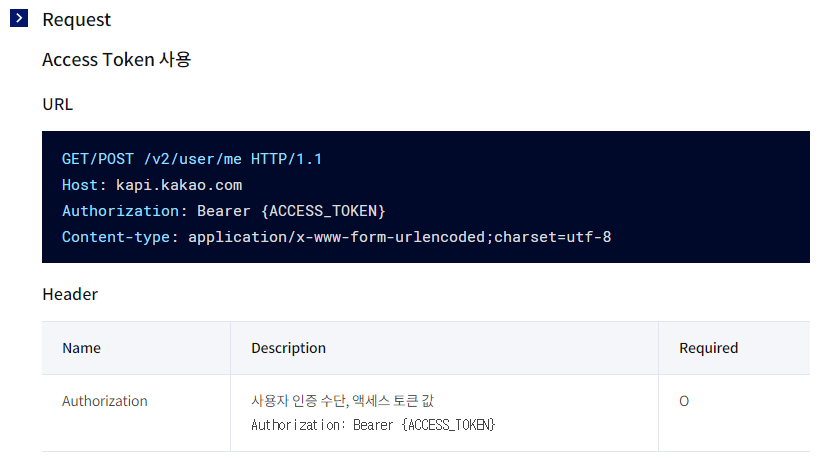
// 카카오 사용자 핸드폰 번호 추출
public HashMap<String, Object> getKakaoUniqueNo(String accessToken) throws Exception {
//요청하는 클라이언트마다 가진 정보가 다를 수 있기에 HashMap타입으로 선언
HashMap<String, Object> userInfo = new HashMap<>();
String reqURL = "https://kapi.kakao.com/v2/user/me";
try {
URL url = new URL(reqURL);
HttpURLConnection conn = (HttpURLConnection) url.openConnection();
conn.setRequestMethod("GET");

//요청에 필요한 Header에 포함될 내용
conn.setRequestProperty("Authorization", "Bearer " + accessToken);

int responseCode = conn.getResponseCode();
System.out.println("responseCode : " + responseCode);

BufferedReader br = new BufferedReader(new InputStreamReader(conn.getInputStream()));

String line = "";
String result = "";

while ((line = br.readLine()) != null) {
result += line;
}
System.out.println("response body : " + result);

JsonParser parser = new JsonParser();
JsonElement element = parser.parse(result);

JsonObject kakao_account = element.getAsJsonObject().get("kakao_account").getAsJsonObject();

String phone_number = kakao_account.getAsJsonObject().get("phone_number").getAsString();

userInfo.put("phone_number", phone_number);

} catch (IOException e) {
// TODO Auto-generated catch block
e.printStackTrace();
}

return userInfo;
}